Android Development Notes
Table of Contents
- Table of Contents
- Basics
- App Resources
- Permissions
- Gradle
- Layout
- Activities
- Fragments
- Notifications
- Android Studio Tips
- Miscellaneous
- Resources
Basics
-
Layout is typically defined in XML, whereas activities are in Java class.
-
The Android operating system is a multi-user Linux system in which each app is a different user.
App Resources
-
String array:
android:entries="@array/foo".1 2 3 4<string-array name="foo"> <item>bar1</item> <item>bar2</item> </string-array> -
1 2 3 4<?xml version="1.0" encoding="utf-8"?> <resources> <drawable name="icon">@drawable/icon_ca</drawable> </resources> -
Referencing style attributes:
android:textColor="?android:textColorSecondary
Permissions
Gradle
compileSdkVersionvstargetSdkVersionvsminSdkVersion:compileSdkVersion: The app can use all the API features from this version and lower.targetSdkVersion: The version we’ve tested our app.minSdkVersion: The minimum version the app can support.
Layout
-
<EditText>is an editable text field:android:hint="@string/hint": normally “Enter a message”, telling the user what to type;android:ems="10": 10-M space.
-
android:layout_weight="number"makes a view stretch.- If a has the weight of 1 and b has 2, a’ll have 1/3 and b’ll have 2/3 of the screen.
- We usually have
android:layout_height="0dp"(for vertical layout) above layout_weight.
-
android:gravity="top"moves the CONTENT of a view to the top of the view, whereasandroid:layout_gravity="end"moves the placement of the VIEW itself to the end. -
<FrameLayout></FrameLayout>allows views to overlap. Ues it when we need to replace the fragments and add the changes to the back stack. -
Surround LinearLayout/FrameLayout with
<ScrollView></ScrollView>to get a vertical scrollbar. (HorizontalScrollViewfor the horizontal scrollbar.) -
A CoordinatorLayout allows the behavior of one view to affect the behavior of another.
-
AdapterView:
1 2 3 4 5 6 7 8 9 10 11 12ArrayAdapter<String> adapter = new ArrayAdapter<String>(this, android.R.layout.simple_list_item_1, myStringArray); ListView listView = (ListView) findViewById(R.id.listview); listView.setAdapter(adapter) // Create a message handling object as an anonymous class. private OnItemClickListener messageClickedHandler = new OnItemClickListener() { public void onItemClick(AdapterView parent, View v, int position, long id) { // Do something in response to the click } }; listView.setOnItemClickListener(messageClickedHandler); -
Re-using layouts with include:
<merge></merge><include layout="@layout/foo"/> -
Spinners:
1 2 3 4 5 6 7 8 9 10 11 12 13 14 15 16Spinner s1 = (Spinner) findViewById(R.id.spinner1); ArrayAdapter adapter = ArrayAdapter.createFromResource( this, R.array.colors, android.R.layout.simple_spinner_item); adapter.setDropDownViewResource(android.R.layout.simple_spinner_dropdown_item); s1.setAdapter(adapter); s1.setOnItemSelectedListener(new AdapterView.OnItemSelectedListener() { @Override public void onItemSelected(AdapterView<?> parent, View view, int position, long id) { // TODO } @Override public void onNothingSelected(AdapterView<?> parent) { // sometimes you need nothing here } }); -
Buttons Set onClick programmatically:
1 2 3 4 5 6Button button = (Button) findViewById(R.id.button_send); button.setOnClickListener(new View.OnClickListener() { public void onClick(View v) { // Do something in response to button click } });1 2 3 4 5 6 7findViewById(R.id.button_send).setOnClickListener { foo(it) } // or findViewById(R.id.button_send).setOnClickListener { view -> //... } -
1 2 3android:checked="true" android:textOff="OFF" android:textOn="ON1 2 3 4 5 6 7 8 9 10Switch sw = (Switch) findViewById(R.id.switch1); sw.setOnCheckedChangeListener(new CompoundButton.OnCheckedChangeListener() { public void onCheckedChanged(CompoundButton buttonView, boolean isChecked) { if (isChecked) { // The toggle is enabled } else { // The toggle is disabled } } }); -
Pickers (Time/Date Pickers)
-
Centralized onClick events:
1 2 3 4 5 6 7 8 9 10 11 12 13 14 15 16 17 18 19 20 21 22 23 24 25 26 27public class ActivityA extends Activity implements View.OnClickListener { @Override protected void onCreate(@Nullable Bundle savedInstanceState) { super.onCreate(savedInstanceState); findViewById(R.id.first).setOnClickListener(this); findViewById(R.id.second).setOnClickListener(this); findViewById(R.id.third).setOnClickListener(this); } @Override public void onClick(View v) { switch (v.getId()) { case R.id.first: // Manage click. break; case R.id.second: // Manage click. break; case R.id.third: // Manage click. break; } } } -
App bar:
-
Set up the app bar (Use
Toolbarinstead of the nativeActionBar) and Add an up action1android:theme="@style/Theme.AppCompat.Light.NoActionBar"1 2 3 4 5 6 7 8<android.support.v7.widget.Toolbar android:id="@+id/my_toolbar" android:layout_width="match_parent" android:layout_height="?attr/actionBarSize" android:background="?attr/colorPrimary" android:elevation="4dp" android:theme="@style/ThemeOverlay.AppCompat.ActionBar" app:popupTheme="@style/ThemeOverlay.AppCompat.Light"/>1 2 3 4 5 6 7 8 9 10 11<!-- A child of the main activity --> <activity android:name="com.example.myfirstapp.MyChildActivity" android:label="@string/title_activity_child" android:parentActivityName="com.example.myfirstapp.MainActivity" > <!-- Parent activity meta-data to support 4.0 and lower --> <meta-data android:name="android.support.PARENT_ACTIVITY" android:value="com.example.myfirstapp.MainActivity" /> </activity>1 2 3 4 5 6 7 8// OnCreate Toolbar myToolbar = (Toolbar) findViewById(R.id.my_toolbar); setSupportActionBar(myToolbar); // Get a support ActionBar corresponding to this toolbar ActionBar ab = getSupportActionBar(); // Enable the Up button ab.setDisplayHomeAsUpEnabled(true);
-
-
Toasts:
Toast toast = Toast.makeText(this, "hello world", Toast.LENGTH_SHORT); toast.show();
Activities
-
All activities have to extend the Activity class or its subclass.
-
R is a special Java class that enables you to retrieve references to resources.
TextView foo = findViewById(R.id.foo) -
Use Intent to call another activity (can be from other apps):
-
Explicit intent:
1 2 3 4 5public void onSendMessage(View view) { Intent intent = new Intent(this, FooActivity.class); // explicit intent intent.putExtra("message", value); // message is the name of the extra startActivity(intent); }1 2 3... Intent intent = getIntent(); String string = intent.getStringExtra("message"); -
Implicit intent: (with actions to allow users to choose which app to run)
1 2 3 4 5 6 7 8 9 10 11Intent intent = new Intent(Intent.ACTION_SEND); // ACTION_DIAL/ACTION_WEB_SEARCH intent.setType("text/plain"); intent.putExtra(Intent.EXTRA_TEXT, messageText); String chooserTitle = getString(R.string.chooser); // Ensure that the user always get the chance to choose an activity Intent chosenIntent = Intent.createChooser(intent, chooserTitle); // Start an activity if it's safe if (intent.resolveActivity(getPackageManager()) != null) { startActivity(chosenIntent); }
-
-
Save the instance state:
1 2 3 4 5 6 7 8 9 10 11 12 13// Either in onCreate savedInstanceState != null or use the method below public void onRestoreInstanceState(Bundle savedInstanceState) { super.onRestoreInstanceState(savedInstanceState); seconds = savedInstanceState.getInt("seconds"); running = savedInstanceState.getBoolean("running"); } @Override public void onSaveInstanceState(Bundle savedInstanceState) { super.onSaveInstanceState(savedInstanceState); savedInstanceState.putInt("seconds", seconds); savedInstanceState.putBoolean("running", running); } -
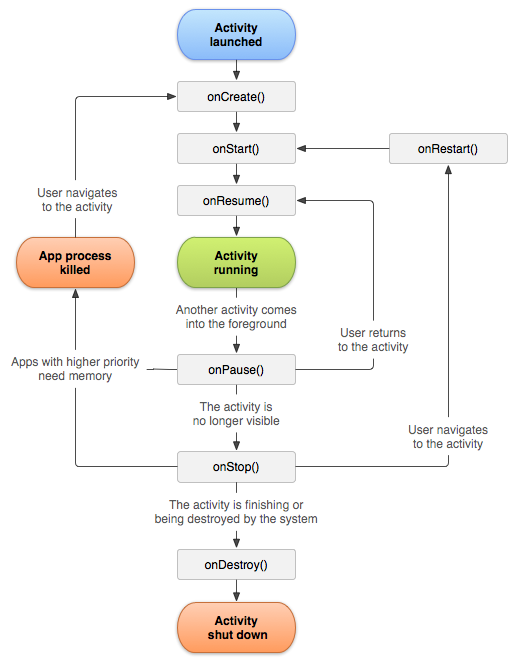
Activity lifecycle:
- When we implement them (
onCreate(),onStart(),onResume(),onPause(),onStop(),onRestart(),onDestroy()), we must call the super class methods. onResume()is called when the activity is started OR resumed;onPause()is called when the activity is paused OR stopped.
- When we implement them (
-
Defining launch modes (singleTop, singleTask, etc.)
Fragments
-
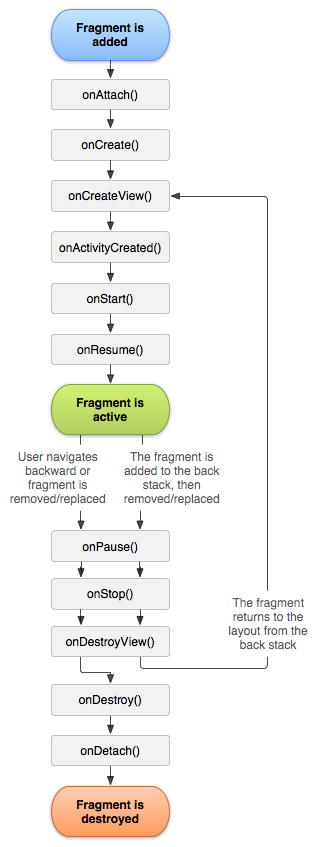
Fragment lifecycle:

-
Example:
1 2 3 4 5 6 7 8public static class ExampleFragment extends Fragment { @Override public View onCreateView(LayoutInflater inflater, ViewGroup container, Bundle savedInstanceState) { // Inflate the layout for this fragment return inflater.inflate(R.layout.example_fragment, container, false); // In this case, this is false because the system is already inserting the inflated layout into the container } } -
Add the fragment programmatically:
1 2 3 4 5FragmentManager fragmentManager = getSupportFragmentManager(); FragmentTransaction fragmentTransaction = fragmentManager.beginTransaction(); ExampleFragment fragment = new ExampleFragment(); fragmentTransaction.add(R.id.fragment_container, fragment); fragmentTransaction.commit(); -
Fragment transactions:
-
Example:
1 2 3 4 5 6 7 8 9 10 11// Create new fragment and transaction Fragment newFragment = new ExampleFragment(); FragmentTransaction transaction = getSupportFragmentManager().beginTransaction(); // Replace whatever is in the fragment_container view with this fragment, // and add the transaction to the back stack transaction.replace(R.id.fragment_container, newFragment); transaction.addToBackStack(null); // Commit the transaction transaction.commit();
-
-
For dynamic fragments, use FrameLayout instead of Fragment and use FragmentTransaction.
Notifications
Android Studio Tips
-
Improve code inspection with annotations (
@Nullable,@NonNull…) -
Tools attributes reference (
tools:text="foo",tools:itemCount="3"...) -
Debug your app (
private static final String TAG = "MyActivity"; Log.d(TAG, "foo");) -
Write and View Logs with Logcat (e (error), w (warning), i (information), d (debug), v (verbose))
Miscellaneous
-
Android builds the back stack to keep track of the activity/fragment transactions.
-
Create Deep Links to App Content:
1 2 3 4 5<intent-filter> ... <data android:scheme="https" android:host="www.example.com" /> <data android:scheme="app" android:host="open.my.app" /> </intent-filter> -
Adding Swipe-to-Refresh To Your App (Add
SwipeRefreshLayoutas the parent of a singleListVieworGridView.) (android.support.v4.widget.SwipeRefreshLayout) -
1 2 3 4 5 6 7 8 9 10 11 12mySwipeRefreshLayout.setOnRefreshListener( new SwipeRefreshLayout.OnRefreshListener() { @Override public void onRefresh() { Log.i(LOG_TAG, "onRefresh called from SwipeRefreshLayout"); // This method performs the actual data-refresh operation. // The method calls setRefreshing(false) when it's finished. myUpdateOperation(); } } );1 2 3 4 5 6 7 8 9 10 11 12 13 14 15 16 17 18 19 20 21 22// For refreshing in the app bar @Override public boolean onOptionsItemSelected(MenuItem item) { switch (item.getItemId()) { // Check if user triggered a refresh: case R.id.menu_refresh: Log.i(LOG_TAG, "Refresh menu item selected"); // Signal SwipeRefreshLayout to start the progress indicator mySwipeRefreshLayout.setRefreshing(true); // Start the refresh background task. // This method calls setRefreshing(false) when it's finished. myUpdateOperation(); return true; } // User didn't trigger a refresh, let the superclass handle this action return super.onOptionsItemSelected(item); }

